The central nervous system is composed of many different types of cells, including neurons and glial cells. Among them, neurons can be classified into many types according to different shapes, sizes, and functions. Glial cells mainly include astrocytes, oligodendrocytes and microglia.
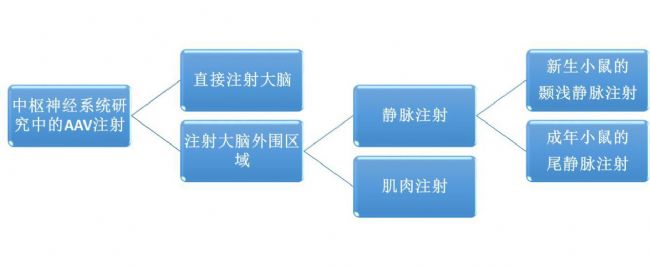
The application of AAV in the central nervous system (CNS) includes many aspects, such as research and treatment in nervous system diseases and central nervous system damage, and local transgenic research in some neurological disease models.
Due to the different serotypes, transcription factors and injection sites of AAV, transgenes mediated by AAV in the brain are usually not homogeneous, and this heterogeneity is manifested in both time and space (specificity of different cell types). In addition, AAV virus preparation techniques (affecting purity and titer) and viral injection methods can greatly affect the efficiency of AAV-mediated transgenes. It is worth noting that the detection methods used after AAV infection and the natural properties of the protein of interest (intracellular protein/secretory protein/transporter) also influence the final evaluation of the transgenic effect. Histological staining, such as immunohistochemistry or single/double immunofluorescence, can help to observe the distribution characteristics of transgene expression, but it cannot quantify the efficiency of viral infection. Transgenic efficiency can be quantified by ELISA or RT-qPCR of brain extracts.
In fact, different transduction patterns can be generated by direct injection of AAV into the brain or peripheral regions of the brain (muscle or intravenous injection). A literature has been shown to cross the blood brain barrier in mouse/cat and non-human primates. Also, AAV vectors can be retrogradely transported from the muscle to spinal motor neurons (27-30). Simply put, the axons of motor neurons are exposed to the AAV virus and transmitted to the cell body. Experiments show that the retrograde efficiency of AAV1 is higher. This article mainly introduces several AAV injection methods commonly used in neuroscience research.
one. Direct injection of AAV into the brain via a stereotactic device (requires gloves and masks)
At present, brain maps of adult male and female rats and mice are available in literature and books. In stereotactic surgery, the most common injection reference point on the skull is the anterior bract, which is the intersection of the sagittal coronal suture. The specific injection site can be determined according to the needs of the study. Minimally invasive techniques can avoid inflammation and reduce the rejection of transduced cells.
1. Install the locator: Install the stereo positioning frame and tools in the biosafety cabinet.
2. Prepare and fill the virus suspension: Install an ultra-micro syringe on the nozzle, immerse the needle tip in the prepared AAV virus suspension and fill it with the “fast reverse†function.
3. Exclude air: Use the “fast forward†function to check the foam and know that a drop of liquid is present at the needle. Gently wipe the droplets from the tip with cotton soaked in 0,1 M NaOH solution.
4. Anesthetized rats: Rats of about 250 g were selected, and xylazine (10 mg/kg) and ketamine (100 mg/kg) were injected through a 25 G 1 ml syringe.
5. Fixation of the rat: The lower incisor of the rat was first fixed on the tooth stick, and then fixed with the ear rod through the external auditory canal of the rat, and the head was fixed. Check that the skull is level and that both eyes are on the same level. A drop of polyacrylic acid was dropped into each eye to prevent the eyes from drying out due to anesthesia. Adjust the light source to the head of the rat, shave the hair of the head and disinfect with alcohol.
6. Incision and exposure of the anterior humeral point: the anterior and posterior axis incision is made on the scalp with a blade, and the knife edge is kept open with pliers, and the blood is sucked with a cotton ball. The periosteum is removed to see the bregma.
7. Expose the λ point: adjust the vertical position of the tooth holder so that the heights of the front and the λ points are consistent. If the position of the λ point is difficult to see, let the incision dry for 5-10 minutes before searching.
8. Determine the distance between the AP and ML coordinates of the anterior chimney point and the target injection point: Align the needle perpendicular to the anterior humeral point and record the values ​​of the AP and ML coordinates. The AP and ML coordinates of the target injection site and the target injection site were calculated and labeled with reference to the AP and ML values ​​of the labeled target injection site of the rat brain map.
9. Determine the DV coordinates of the hemispherical point and the distance from the target injection point: use a drill bit to make a hole in the skull, taking care not to damage the dura mater. The tip of the needle was placed on the surface of the dura mater and the coordinates of the frontal point DV were measured. Calculate the DV coordinates of the target injection site.
10. Injection AAV: Slowly move the needle tip of the syringe vertically to the target injection site, slowly insert the needle and let it stand for 5 min. Then, 2 μL of the virus suspension was injected into the brain at a rate of 0.2 μl/min. After the end, it is necessary to let stand for 5 minutes and then slowly remove the syringe.
11. Stitch and mark: suture the scalp and make ear tags.
12. Postoperative care in rats: Place the rats in a clean cage until they wake up. On the first day, the rats were allowed to spend in a separate ventilated cage.
13. Handle needles and surgical materials: first clean the surgical tool with 0.1 M NaOH or 10% chlorine bleach, rinse with distilled water, and finally rinse with alcohol.
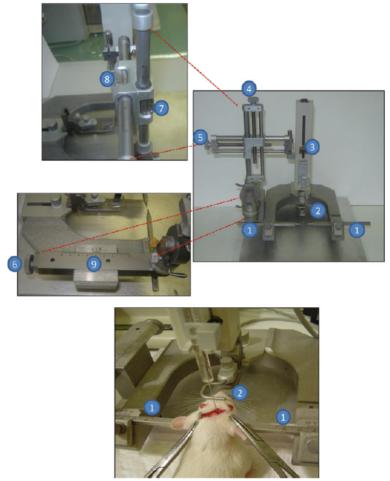
Figure 1: Brain stereotaxic instrument. (1) ear stick; (2) tooth rod; (3) syringe holder; (4) set vertical coordinate screw; (5) set lateral
Coordinate screw; (6) Set front and rear coordinates of the screw; (7) Vertical vernier scale; (8) Side vernier scale; (9) Front and rear vernier scale.
two. Intravenous AAV9
(1) Intravenous injection of neonatal mice
1. Adjust the position of the light source to illuminate the area of ​​the microscope, with moderate intensity illumination.
2. Place a newborn rat directly on ice for 1-3 min for anesthesia.
3. When the animal is anesthetized on ice, fill the syringe with AAV virus. The volume should not exceed 100 μL, and the volume between 30 and 100 μL does not affect the transduction efficiency.
4. Observe the young rats under the microscope. The index finger of the hand holding the syringe is placed at the nose and mouth of the young mouse, and the middle finger is placed at the ear bud to stretch the skin of the young mouse, and the superficial vein is visible.
5. Determine the superficial vein. It can be seen through the skin in the front of the ear bud, in the lower part of the surrounding capillaries, there is a vaguely visible venous blood vessel, from the back to the abdomen, into the jugular vein, which is the superficial vein.
6. Insert the sinus of the syringe tip into the iliac vein. It can be seen that the bevel of the tip is filled with blood after passing through the skin. Lightly press the syringe and notice that the veins on the side of the face of the baby are white.
(B) the tail vein injection of adult mice
1. Make sure the animal enters the restraint.
2. Wipe the tail with alcohol.
3. Put the tail in warm water.
4. Fill the syringe with the AAV virus suspension.
5. Insert the syringe into the tail vein. If you don't aim, you can try again near the root of the tail.
6. Inject the virus solution. The volume is controlled at 100-250 μL.
7. Return the mouse to the cage.
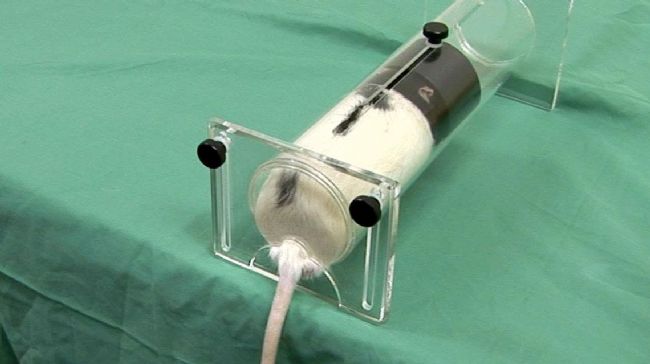
Figure 2: Animal restraint
three. Retrograde transport of AAV from peripheral nerves to target neurons
1. Rats of about 250 g were selected and xylazine (10 mg/kg) and ketamine (100 mg/kg) were injected through a 25 G 1 ml syringe.
2. Place the anesthetized rat on a sterile cloth. A drop of polyacrylic acid was dropped into each eye to prevent the eyes from drying out due to anesthesia.
3. Scrape the hair near the muscles and clean with alcohol. Use a blade to cut a small opening in the skin and use a forceps to keep the knife open to expose the muscles.
4. Inhale the AAV virus suspension using an ultra-micro syringe and remove air and air bubbles.
5. Squeeze the muscles to establish a certain thickness of the muscles and place the needle tip on the muscles.
6. Slowly insert the needle tip and let it stand in the muscle for 1 min. Then, 10-20 μl of the AAV suspension was injected at a rate of 10 μl/min.
7. After the injection, the needle was allowed to stand in the muscle for 2 min, and then slowly pulled out. Multiple injections are possible.
8. Stitch the skin and make ear tags. Place the rats in a clean cage until they wake up
9. Rinse the surgical tool with 0.1 M NaOH or 10% chlorine bleach, rinse with distilled water, and rinse with alcohol.
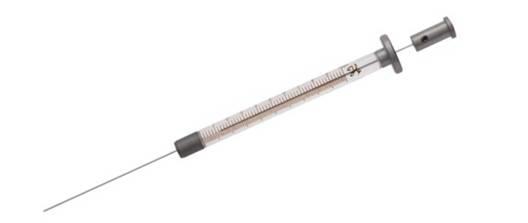
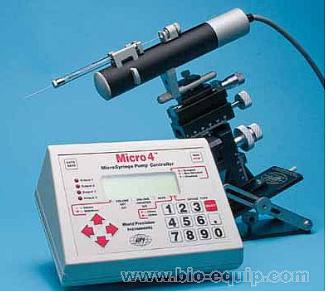
Figure 3: Ultra-micro syringe
Butyl Rubber Stopper For Film Coated
We are a chinese origin manufacturer , we majored in producing rubber products for almost 10 years , which allows us to offer a wide range products for you . Our products now are widely used in clinical injection, transfusion and other packaging. We now have a 100-100000 class cleaning workshop which meets the GMP standard. From input to output, we have a strict quality control throughout the whole production line. We have full test instruments and tools according to the standard documents.
Butyl Rubber Stopper For Film Coated,Stopper For Film Coated,Silicone Rubber Stopper,Butyl Bottles Silicone Rubber Stopper
Suzhou CRH New Material Technology Co.,Ltd. , https://www.crh-health.com